About this codelab
Overview
Location Kit combines the GNSS, Wi-Fi, and base station location functionalities into your app to build up global positioning capabilities, allowing you to provide flexible location-based services for global users. Currently, it provides three main capabilities: fused location, activity identification, and geofence.
-
Fused location: Provides a set of easy-to-use APIs for your app to quickly obtain the device location based on the GNSS, Wi-Fi, and base station location data.
-
Geofence: Allows you to set an interested area through an API so that your app can receive a notification when a specified action (such as leaving, entering, or staying in the area) occurs.
-
Enter: Informs that the device has entered the geofence.
-
Dwell: Informs that the device has entered and is being inside the geofence for a given period of time.
-
Exit: Informs that the device has exited the geofence.
-
-
Activity identification: Identifies user motion status through the acceleration sensor, cellular network information, and magnetometer, helping you adapt your app to user behavior.
- Activity Identification Updates: Proactively obtains the current device activity status.
- Activity Conversion Updates: Detects activity conversion updates of the current device.
What you will do
In this codelab, you will use the demo project that has been created for you to experience with Huawei Mobile Services Location Kit’s Geofence and Activity Identification features. Through the demo project, you will get experience developing a geofence and physical activity identification to the user.

What you will learn
In this codelab, you will learn how to:
- Handle broadcast receivers.
- Add geofences.
- Remove geofence.
- Handle geofence transitions.
- Add activity identifications.
- Remove activity identifications.
- Register activity conversions.
- Unregister activity conversions.
Hardware Requirements
- A computer (desktop or laptop)
- A Huawei mobile phone which is Android 9 (API level 28) or later, to be used for demo project running and service debugging.
Software Requirements
- Android Studio 3.x or later version(Download).
- Java JDK 1.8 or later version(Download).
- EMUI 9.1.1 or later
- HMS Core (APK) 5.0.4.300 or later
Required Knowledge
You should be familiar with:
- Kotlin development language basics
- Android development basics
- MVVM architecture basics
- Runtime permissions
Before you get started, complete the following preparations:
- Create an app in AppGallery Connect.
- Create an Android Studio project.
- Generate a signing certificate.
- Generate a signing certificate fingerprint.
- Configure the signing certificate fingerprint.
- Add the app package name and save the configuration file.
- Configure the Maven repository address and AppGallery Connect gradle plug-in.
- Configure the signature file in Android Studio.
For details, please refer to Preparations for Integrating HUAWEI HMS.
To get started, clone the GitHub repository of the codelab and switch to the start branch.
$git clone https://github.com/huaweicodelabs/LocationKit/tree/master/activity-identification-and-geofence
You’ll be using the start branch, which is the starting point for the codelab. On master branch, you can check your work, or reference if you face any issues.
Creating a Project
Step 1: Start Android Studio.
Step 2: Choose File > Open, go to the directory where the sample project is decompressed, and click OK.
Step 3: Configure the AppGallery Connect plug-in, Maven repository address, build dependencies, obfuscation scripts, and permissions.
1. Configure the Maven repository address and AppGallery Connect plug-in in the project’s build.gradle file.
-
Go to allprojects > repositories and configure the Maven repository address for the HMS Core SDK.
allprojects { repositories { maven { url 'https://developer.huawei.com/repo/' } ... } } -
Go to buildscript > repositories and configure the Maven repository address for the HMS Core SDK.
buildscript { repositories { maven {url 'https://developer.huawei.com/repo/'} ... } ... } -
Go to buildscript > dependencies and add build dependencies.
buildscript {
		dependencies {
                        //Replace {agconnect_version} with the actual AGC plugin version number.
                        //Example: classpath 'com.huawei.agconnect:agcp: 1.4.1.300'
			classpath 'com.huawei.agconnect:agcp:{agconnect_version}'
		}
	}
2. Configure the dependency package in the app’s build.gradle file.
-
Add a dependency package to the dependencies section in the build.gradle file.
dependencies {
		...
    		//Location Kit
		implementation 'com.huawei.hms:location:5.0.4.300'
		...
	}
Please, refer to latest version for Location Kit.
-
Add the following information under apply plugin: ‘com.android.application’ in the file header:
apply plugin: 'com.huawei.agconnect'
3. Configure obfuscation scripts.
-
Configure the following information in the app/proguard-rules.pro file:
-ignorewarnings -keepattributes *Annotation* -keepattributes Exceptions -keepattributes InnerClasses -keepattributes Signature -keepattributes SourceFile,LineNumberTable -keep class com.hianalytics.android.**{*;} -keep class com.huawei.updatesdk.**{*;} -keep class com.huawei.hms.**{*;} -
If you are using AndResGuard, add it to the allowlist in the obfuscation script file.
"R.string.hms*",
"R.string.connect_server_fail_prompt_toast",
"R.string.getting_message_fail_prompt_toast",
"R.string.no_available_network_prompt_toast",
"R.string.third_app_*",
"R.string.upsdk_*",
"R.layout.hms*",
"R.layout.upsdk_*",
"R.drawable.upsdk*",
"R.color.upsdk*",
"R.dimen.upsdk*",
"R.style.upsdk*",
"R.string.agc*"
Step 4: In the Android Studio window, choose File > Sync Project with Gradle Files to synchronize the project.
Now, you’re set up, and ready to implement geofence and activity identification services.
To use activity identification and geofence in your app, you must implement the Huawei Location Kit library to the dependencies, and specify related permissions in the app manifest.
-
Specify android.permission.ACCESS_FINE_LOCATION, android.permission.ACCESS_COARSE_LOCATION and android.permission.ACCESS_BACKGROUND_LOCATION permissions in the AndroidManifest.xml file to use geofence service.
<uses-permission android:name="android.permission.ACCESS_FINE_LOCATION"/> <uses-permission android:name="android.permission.ACCESS_COARSE_LOCATION"/> <uses-permission android:name="android.permission.ACCESS_BACKGROUND_LOCATION"/> -
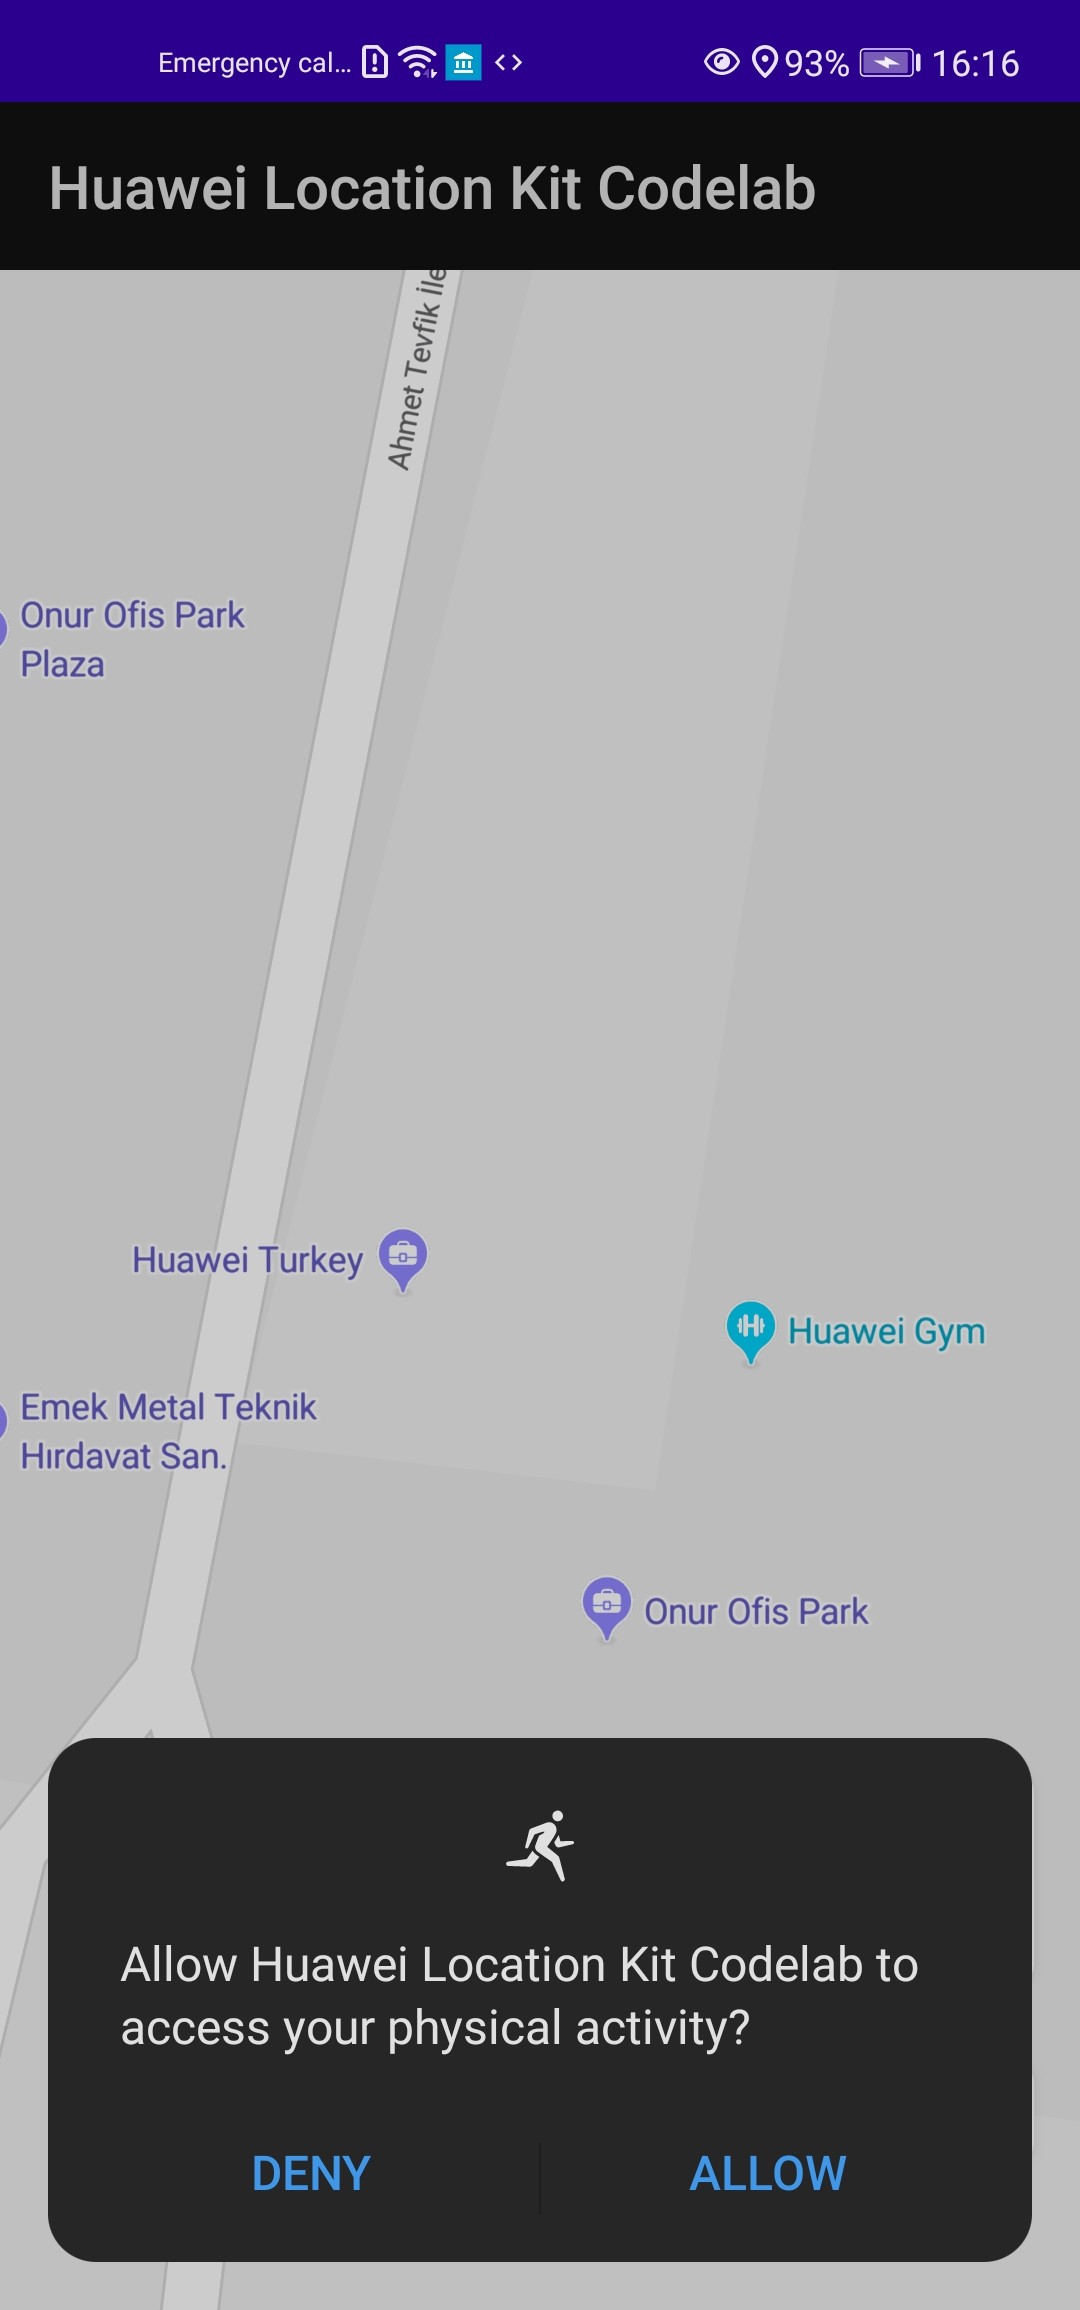
Specify com.huawei.hms.permission.ACTIVITY_RECOGNITION and android.permission.ACTIVITY_RECOGNITION permissions in the AndroidManifest.xml file to use activity identification service.
<uses-permission android:name="android.permission.ACTIVITY_RECOGNITION"/> <uses-permission android:name="com.huawei.hms.permission.ACTIVITY_RECOGNITION"/> -
Check receiver tag in the AndroidManifest.xml file, in application tag. There is no action needed for the step, just check the receiver.
<receiver android:name=".util.LocationBroadcastReceiver"/> -
If you create your own project, you need to change some constant variables to use broadcast receiver and map capabilities. In util package, go
Constants.ktclass, set the package name and AppGallery Connect API key as yours.You can find the API key, in AppGallery console, in Project setting > General information.
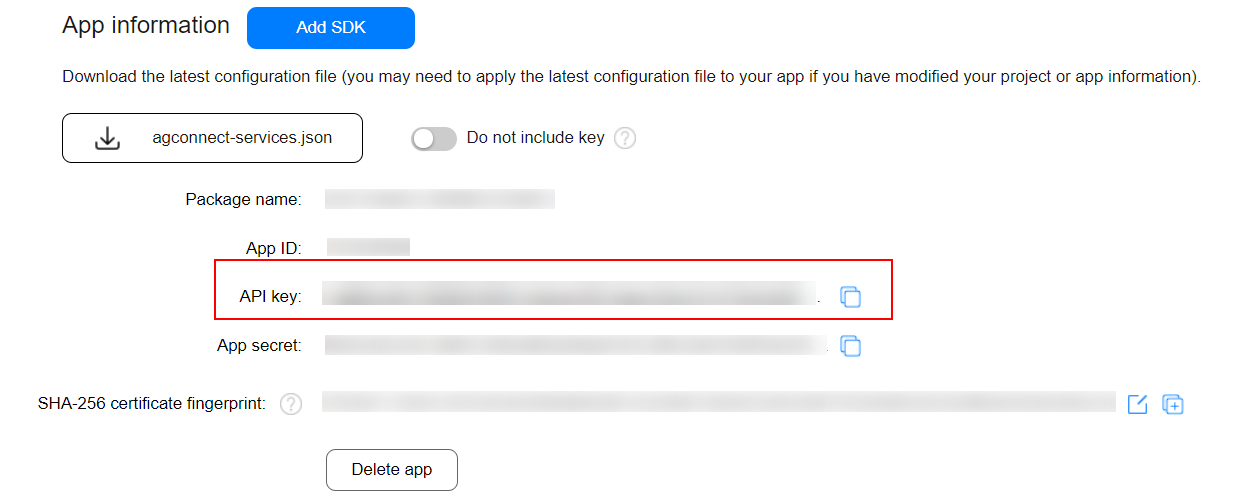
//TODO 1.4:
        private const val PACKAGE_NAME = "YOUR PACKAGE NAME"
        internal const val AGC_API_KEY = "YOUR API KEY"
Create pending intent
You will create a PendingIntent in order to dynamically register to BroadcastReceiver through it.
-
In
MainFragment.kt, above theonViewCreated()method, create a private type ofPendingIntentvariable which namedgeofencePendingIntentwith lazy initialization.getGeofenceAction()returns action name asString, andgetGeofenceRequestCode()returns request code asInteger. Both are implemented inGeofenceHelper.kt.//TODO 2.1: private val geofencePendingIntent: PendingIntent by lazy { val intent = Intent(context, LocationBroadcastReceiver::class.java) intent.action = getGeofenceAction() PendingIntent.getBroadcast( context, getGeofenceRequestCode(), intent, PendingIntent.FLAG_UPDATE_CURRENT ) }
Create geofence service
You will create a geofence service client to call geofence-related APIs.
-
In
MainFragment.kt, above theonViewCreated()method, declare a private type ofGeofenceServicevariable which namedgeofenceService.//TODO 2.2: private lateinit var geofenceService: GeofenceService -
In
MainFragment.kt, in theonViewCreated()method, initializegeofenceServicewhich is already declared above.//TODO 2.3: geofenceService = LocationServices.getGeofenceService(activity)
Build geofence and geofence request
You will build a geofence object and a geofence request in order to add geofence.
-
In
MainFragment.kt, in thebuildGeofence()function, build a geofence usingGeofence.Builder(). Set the followings:- A request ID to identify the geofence.
- The circular region of the geofence.
- The transition types.
- The expiration duration of the geofence.
Finally, return the geofence.
//TODO 2.4: return GeofenceRequest.Builder() .createGeofence(geofence) .setInitConversions(GeofenceRequest.ENTER_INIT_CONVERSION) .build() -
In
MainFragment.kt, in thebuildGeofenceRequest()function, build a geofence request usingGeofenceRequest.Builder(). Create geofence to be monitored by geofence service, and set initial trigger callback for conversions. Then, return the request.//TODO 2.5: return Geofence.Builder() .setUniqueId(id) .setRoundArea(latLng.latitude, latLng.longitude, radius) .setConversions(transitionTypes) .setValidContinueTime(Geofence.GEOFENCE_NEVER_EXPIRE) .build()
Start Geofence
Construct a request to add a geofence. After you send the request, the system will notify you of the request result through Task.
-
In
MainFragment.kt, instartGeofence()function, instantiate a variable type ofGeofenceby callbuildGeofence()method which is created above.//TODO 2.6: val geofence: Geofence = buildGeofence( landmark.geofenceUniqueId, landmark.latLng, landmark.radius, Geofence.ENTER_GEOFENCE_CONVERSION ) -
In
MainFragment.kt, instartGeofence()function, instantiate a variable type ofGeofenceRequestby callbuildGeofenceRequest()method which is created above.//TODO 2.7: val geofenceRequest: GeofenceRequest = buildGeofenceRequest(geofence) -
In
MainFragment.kt, instartGeofence()function, usegeofenceServiceto add geofence. At the beginning, remove existing geofence that in use by callingdeleteGeofenceList(). In any case of the removal, add new geofence by passinggeofencePendingIntent, andgeofenceRequesttocreateGeofenceList()method. If adding geofence succeed, inform user withToast. Otherwise, put message intoLogcallinggetGeofenceErrorString()function.//TODO 2.8: geofenceService.deleteGeofenceList(geofencePendingIntent)?.run { addOnCompleteListener { geofenceService.createGeofenceList(geofenceRequest, geofencePendingIntent)?.run { addOnSuccessListener { val toast = Toast.makeText( context, "Geofence started for ${landmark.latLng}", Toast.LENGTH_SHORT ) toast.setGravity(Gravity.CENTER, 0, 0) toast.show() } addOnFailureListener { Log.e( TAG, "Failed to add geofence. Error code: " + getGeofenceErrorString(it) ) val toast = Toast.makeText(context, "Failed to add geofence.", Toast.LENGTH_SHORT) toast.setGravity(Gravity.CENTER, 0, 0) toast.show() } } } } -
In
GeofenceHelper.kt, ingetGeofenceErrorString()function, returnGeofenceErrorCodesasString.//TODO 2.9: if (exception is ApiException) { when (exception.statusCode) { GeofenceErrorCodes.GEOFENCE_UNAVAILABLE -> return "GEOFENCE_UNAVAILABLE" GeofenceErrorCodes.GEOFENCE_NUMBER_OVER_LIMIT -> return "GEOFENCE_NUMBER_OVER_LIMIT" GeofenceErrorCodes.GEOFENCE_PENDINGINTENT_OVER_LIMIT -> return "GEOFENCE_PENDINGINTENT_OVER_LIMIT" } } return exception.localizedMessage
When detecting a geofence trigger event, the system broadcasts a notification to the user using PendingIntent.
-
In
GeofenceHelper.kt, infromGeofenceTransitionToString()function, return transition type asString.//TODO 3.1: return when (transitionType) { Geofence.ENTER_GEOFENCE_CONVERSION -> "You just got in the area!" else -> "UNKNOWN" } -
In
LocationBroadcastReceiver.kt, overrideonReceive()method and usewhenstatement to run related code block, if the action name of an intent matches triggered action. To get action name which set before when you createdPendingIntent, usegetGeofenceAction()function. Copy the code below, and paste into the statement code block. Then, obtainGeofenceDataobject from the intent. Get transition type as String usingfromGeofenceTransitionToString()and inform user withToast. Next, getGeofenceusingconvertingGeofenceList. Last, applyLandmarkrepository functions using geofence’suniqueId.//TODO 3.2: val geofenceData = GeofenceData.getDataFromIntent(intent) geofenceData.let { it -> val info = fromGeofenceTransitionToString(geofenceData.conversion) val toast = Toast.makeText(context, info, Toast.LENGTH_LONG) toast.setGravity(Gravity.CENTER, 0, 0) toast.show() it.convertingGeofenceList.forEach { LandmarkRepositoryImpl.removeMarker(it.uniqueId) LandmarkRepositoryImpl.removeCircle(it.uniqueId) LandmarkRepositoryImpl.deleteLandmark(it.uniqueId) } }
When you no longer need a geofence, you can remove it by geofence’s uniqueId or through PendingIntent.
-
In
MainFragment.kt, inremoveGeofence()function, remove current geofence throughgeofencePendingIntent.//TODO 4.1: geofenceService.deleteGeofenceList(geofencePendingIntent)?.run { addOnSuccessListener { //Geofence removed successfully. Log.i(TAG, "Geofence has been removed.") } addOnFailureListener { //Geofence remove process failed. Log.i(TAG, "Failed to remove Geofence.") } }
Create pending intent
You will create a PendingIntent in order to dynamically register to BroadcastReceiver through it.
-
In
MainFragment.kt, above theonViewCreated()method, create a private type ofPendingIntentvariable which namedactivityIdentificationPendingIntentwith lazy initialization.getActivityIdentificationAction()returns action name asString, andgetActivityIdentificationRequestCode()returns request code asInteger. Both are implemented inActivityIdentificationHelper.kt.//TODO 5.1: private val activityIdentificationPendingIntent: PendingIntent by lazy { val intent = Intent(context, LocationBroadcastReceiver::class.java) //Set an action for activity identification's intent. intent.action = getActivityIdentificationAction() PendingIntent.getBroadcast( context, getActivityIdentificationRequestCode(), intent, PendingIntent.FLAG_UPDATE_CURRENT ) }
Create activity identification service
You will create an activity identification service client to call activity identification-related APIs.
-
In
MainFragment.kt, above theonViewCreated()method, declare a private type ofActivityIdentificationServicevariable which namedactivityIdentificationService.//TODO 5.2: private lateinit var activityIdentificationService: ActivityIdentificationService -
In
MainFragment.kt, in theonViewCreated()method, initializeactivityIdentificationServicewhich is already declared above.//TODO 5.3: activityIdentificationService = ActivityIdentification.getService(context)
Start activity identification
You will start activity identification if activity recognition permission has been granted before.
- In
MainFragment.kt, instartActivityIdentification()function, useactivityIdentificationServiceto add activity identification. First, check the activity recognition permission callinghasActivityRecognitionPermission()function as an if condition. If the permission has not been granted before, the function will ask it. Then, add new activity identification by passing interval parameter in milliseconds asLong, andactivityIdentificationPendingIntenttocreateActivityIdentificationUpdates()method. Copy the code below into the if statement.
//TODO 5.4:
activityIdentificationService.createActivityIdentificationUpdates(
    5000,
    activityIdentificationPendingIntent
)?.run {
    addOnSuccessListener {
        Log.i(TAG, "Activity Identification has been started.")
    }
    addOnFailureListener {
        Log.e(TAG, "Failed to start Activity Conversion updates.")
    }
}
When detecting an activity identification trigger event, the system broadcasts a notification to the user using PendingIntent.
-
In
ActivityIdentificationHelper.kt, infromActivityToString()function, return activity type asString.//TODO 6.1: return when (activityType) { ActivityIdentificationData.STILL -> "standing" ActivityIdentificationData.WALKING -> "walking" ActivityIdentificationData.RUNNING -> "running" ActivityIdentificationData.VEHICLE -> "driving" else -> "Unknown" } -
In
LocationBroadcastReceiver.kt, overrideonReceive()method and use when statement to run related code block, if the action name of an intent matches triggered action. To get action name which set before when you createdPendingIntent, usegetActivityIdentificationAction() function. Copy the code below, and paste into the statement code block. ObtainActivityIdentificationResponseobject from the intent. Then, use it to obtainactivityIdentificationDatacallingactivityIdentificationDatasmethod. Get activity type asStringusingfromActivityToString(). If the possibility more than equal to 70% pass the value tocreateUserActivity()method usingUserActivityRepositoryImpl.//TODO 6.2: val identificationResponse = ActivityIdentificationResponse.getDataFromIntent(intent) identificationResponse?.let { identificationResponse.activityIdentificationDatas.forEach { Log.i( TAG, "Activity: %${it.possibility} ${fromActivityToString(it.identificationActivity)}" ) if (it.possibility >= 70 && !fromActivityToString(it.identificationActivity).equals( "Unknown", true ) ) { UserActivityRepositoryImpl.createUserActivity(it) } } }
When you no longer need to receive activity identification, you can remove it through PendingIntent.
-
In
MainFragment.kt, inremoveActivityIdentification()function, remove current activity identification throughactivityIdentificationPendingIntent.//TODO 7.1: activityIdentificationService.deleteActivityIdentificationUpdates( activityIdentificationPendingIntent ) ?.run { addOnSuccessListener { //Activity Identification removed successfully. Log.i(TAG, "Activity Identification has been stopped.") } addOnFailureListener { //Activity Identification remove process failed. Log.i(TAG, "Failed to stop Activity Identification.") } }
Create pending intent
You will create a PendingIntent in order to dynamically register to BroadcastReceiver through it.
-
In
MainFragment.kt, above theonViewCreated()method, create a private type ofPendingIntentvariable which namedactivityConversionPendingIntentwith lazy initialization.getActivityConversionAction()returns action name asString, andgetActivityConversionRequestCode()returns request code asInteger. Both are implemented inActivityIdentificationHelper.kt.//TODO 8.1: private val activityConversionPendingIntent: PendingIntent by lazy { val intent = Intent(context, LocationBroadcastReceiver::class.java) //Set an action for activity conversion's intent. intent.action = getActivityConversionUpdatesAction() PendingIntent.getBroadcast( context, getActivityConversionRequestCode(), intent, PendingIntent.FLAG_UPDATE_CURRENT ) }
Build activity conversion and create an activity conversion request
You will build an activity conversion information object and create an activity conversion request in order to listen activity conversions.
-
In
MainFragment.kt, in thebuildActivityConversion()function, build an activity conversion usingActivityConversionInfo.Builder(). Set the followings:- An activity type.
- A conversion type.
Finally, return the activity conversion info.
//TODO 8.2: return ActivityConversionInfo.Builder() .setActivityType(activityType) .setConversionType(conversionType) .build() -
In
MainFragment.kt, in thecreateActivityConversionRequest()function, add activity conversion information objects into a list. Finally, pass the list as a parameter toActivityConversionRequest()and return the object.//TODO 8.3: val activityConversions: MutableList‹ActivityConversionInfo› = ArrayList() activityConversions.add( buildActivityConversion( ActivityIdentificationData.STILL, ActivityConversionInfo.ENTER_ACTIVITY_CONVERSION ) ) activityConversions.add( buildActivityConversion( ActivityIdentificationData.WALKING, ActivityConversionInfo.ENTER_ACTIVITY_CONVERSION ) ) activityConversions.add( buildActivityConversion( ActivityIdentificationData.WALKING, ActivityConversionInfo.EXIT_ACTIVITY_CONVERSION ) ) activityConversions.add( buildActivityConversion( ActivityIdentificationData.VEHICLE, ActivityConversionInfo.ENTER_ACTIVITY_CONVERSION ) ) activityConversions.add( buildActivityConversion( ActivityIdentificationData.VEHICLE, ActivityConversionInfo.EXIT_ACTIVITY_CONVERSION ) ) activityConversions.add( buildActivityConversion( ActivityIdentificationData.RUNNING, ActivityConversionInfo.ENTER_ACTIVITY_CONVERSION ) ) activityConversions.add( buildActivityConversion( ActivityIdentificationData.RUNNING, ActivityConversionInfo.EXIT_ACTIVITY_CONVERSION ) ) return ActivityConversionRequest(activityConversions)
Start activity conversion
You will start activity conversion if activity recognition permission has been granted before.
-
In
MainFragment.kt, instartActivityConversion()function, useactivityIdentificationServiceto add activity conversion. Add new activity conversion by passingactivityConversionPendingIntent, andcreateActivityConversionRequest()functions tocreateActivityConversionUpdates()method.//TODO 8.4: activityIdentificationService.createActivityConversionUpdates( createActivityConversionRequest(), activityConversionPendingIntent )?.run { addOnSuccessListener { Log.i(TAG, "Activity Conversion updates has been started.") } addOnFailureListener { Log.i(TAG, "Failed to start Activity Conversion updates.") } }
When detecting an activity conversion trigger event, the system broadcasts a notification to the user using PendingIntent.
-
In
ActivityIdentificationHelper.kt, infromActivityConversionToString()function, return conversion type asString.//TODO 9.1: return when (conversionType) { ActivityConversionInfo.ENTER_ACTIVITY_CONVERSION -> "start" ActivityConversionInfo.EXIT_ACTIVITY_CONVERSION -> "stop" else -> "Unknown" } -
In
LocationBroadcastReceiver.kt, overrideonReceive()method and use when statement to run related code block, if the action name of an intent matches triggered action. To get action name which set before when you createdPendingIntent, usegetActivityConversionAction()function. Copy the code below, and paste into the statement code block. ObtainActivityConversionResponseobject from the intent. Then, use it to obtainactivityConversionDatacallingactivityConversionDatasmethod. Get activity type asStringusingfromActivityConversionToString(). Pass the value tocreateUserActivity()method usingUserActivityRepositoryImpl.//TODO 9.2: val conversionResponse = ActivityConversionResponse.getDataFromIntent(intent) conversionResponse?.let { conversionResponse.activityConversionDatas.forEach { Log.i( TAG, "${fromActivityConversionToString(it.conversionType)} ${fromActivityToString(it.activityType)}" ) UserActivityRepositoryImpl.createUserActivity(it) } }
When you no longer need to receive activity conversion, you can remove it through PendingIntent.
-
In
MainFragment.kt, inremoveActivityConversion()function, remove current activity conversion throughactivityConversionPendingIntent.//TODO 10.1: activityIdentificationService.deleteActivityConversionUpdates( activityConversionPendingIntent )?.run { addOnSuccessListener { //Activity Identification removed successfully. Log.i(TAG, "Activity Conversion updates has been stopped.") } addOnFailureListener { //Removing Activity Conversion process failed. Log.i(TAG, "Failed to stop Activity Conversion updates.") } }
Well done. You have successfully completed this codelab and learned how to:
- Add geofence through a pending intent.
- Remove geofence using geofence service client.
- Add activity identification through a pending intent.
- Remove activity identification using activity identification service client.
- Add activity conversion through a pending intent.
- Remove activity conversion using activity identification service client.
- Integrate a broadcast receiver to detect when a geofence triggered, and when activity status changes by overriding the
onReceive()method.
That’s all, you have finished the codelab. Install your app on your mobile device through running your project.
- Long click somewhere on the map to put a marker. You can add as many as you want.
- Click one of the marker that you have created to start geofence to the area.
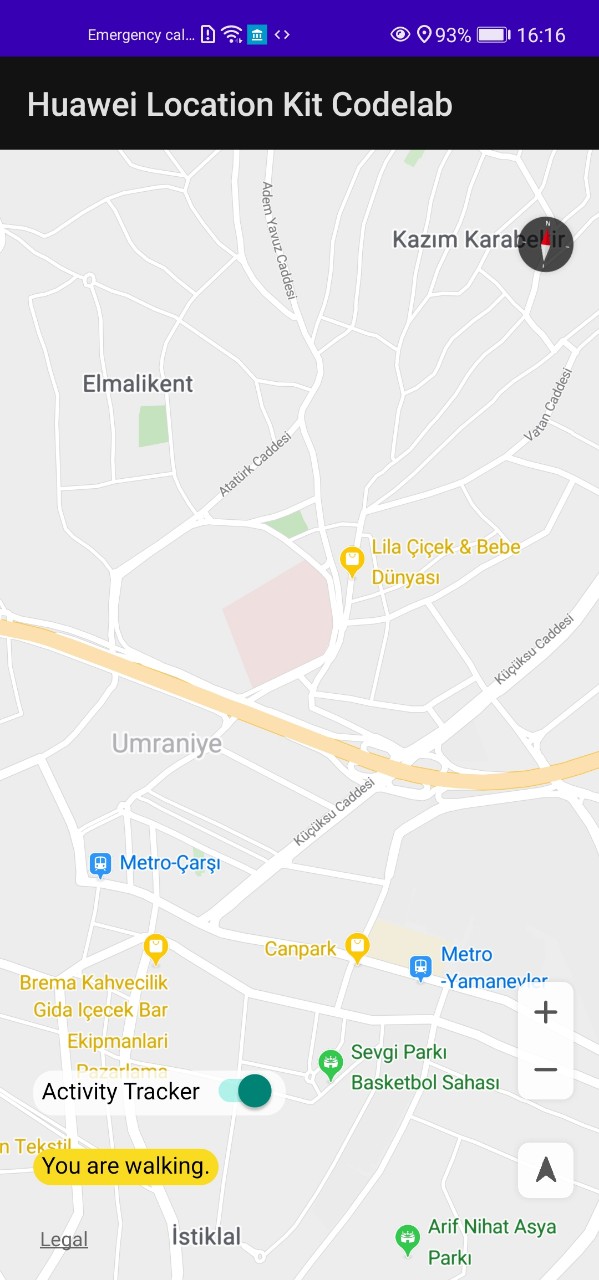
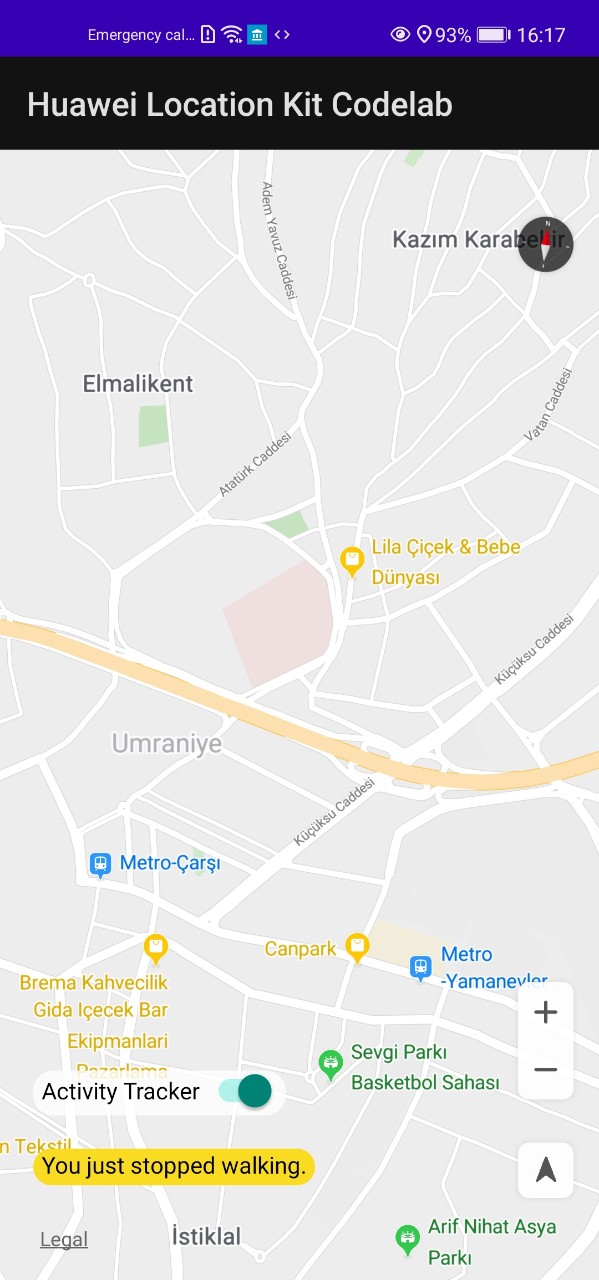
- Switch on Activity Tracking to identify user’s physical activity.
- Walk around and enjoy your app. :)